
Visit Activities
The above chapters gave you an introduction to different screens and modules of SalesWorx. This chapter will explain you how to make customer visits using SalesWorx iPad application.
You can make customer visits from two screens; Route and Customers. You can start a visit from Route screen if the visit is planned. If you are going to make an unplanned visit, you can start it from Customers screen.
The visit activities to be performed for both planned and unplanned visits are the same.
To perform a customer visit, open the Route or Customers screen. Select the customer from the list available on the left side.
Tap on Start Visit button ( ![]() or
or ![]() ) to start a customer visit.
) to start a customer visit.
A pop up will be displayed. You will have to select the type of visit; Onsite or Via Telephone.
Then tap on Continue.

If Geofencing is enforced, and you are not at the customer location, it will prompt for a reason for taking an Onsite visit when you are not at the customer’s defined location.
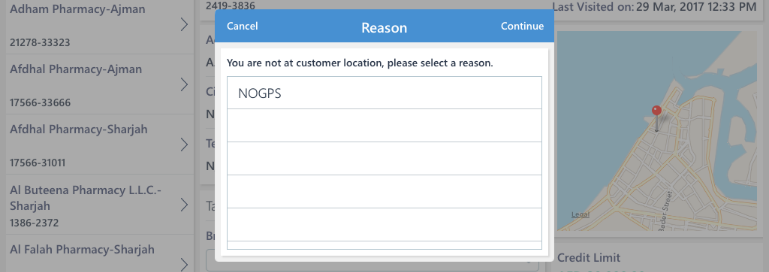
Enter or select the reason to indicate the visit location being different from the customer location. Then tap on Continue.
Visit Options screen will be displayed.

The customer name is displayed on the top, and the type of visit (On site or Via Telephone) will be indicated next to it.
The customer number is shown below this.
The available balance for this customer is displayed on top right corner, along with the date of last visit made to this customer.
You can see different function buttons, tapping on which lets you perform these operations:
• Distribution Check
• Sales Order entry
• Returns
• Collections
• Surveys
• Tasks
• View Order History
• Manage Orders
Distribution Check
In Distribution Check, you are making a note of the availability of products at the customer site. You can make note of available stock, Lot number, and Expiry date. You can also capture an image of the product display for review.
Tap on Distribution Check to open it. You will be able to see the products in MSL.
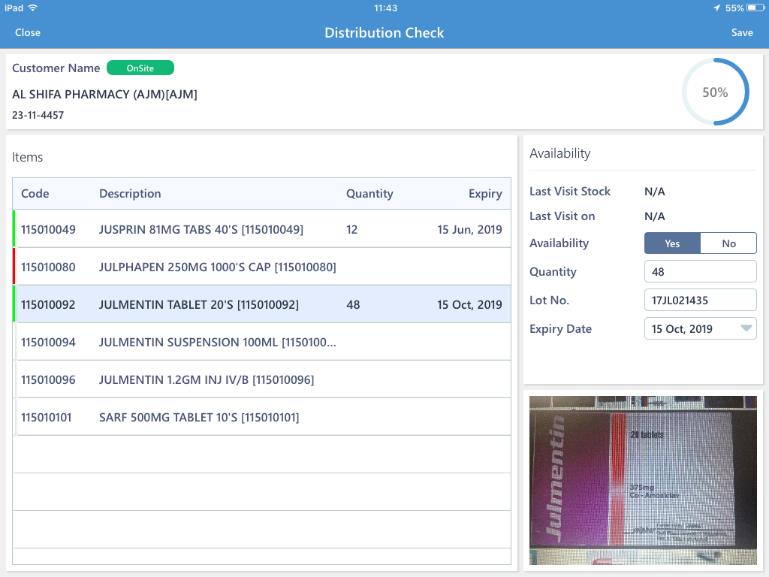
Select a product in ‘Items’ area. You can enter the details in ‘Availability’ area.
Mark the availability as Yes or No.
You can enter available Quantity, Lot number, Expiry Date, and capture the image by tapping on the camera thumbnail.
Continue the process for other products also.
You can observe the progress in the chart above, which displays the completion percentage. 
After the stock details of all the products are noted, tap on Save button available in top right corner.

The app will display a confirmation message once the distribution check is saved.
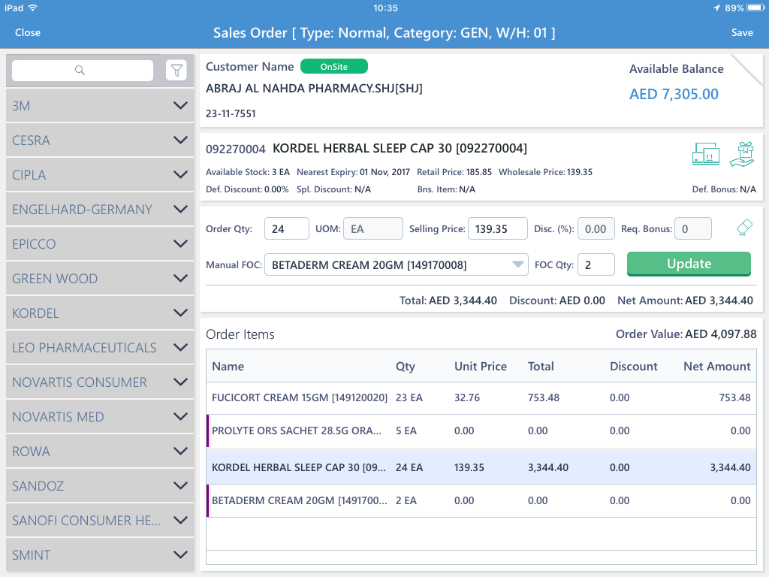
Sales Order
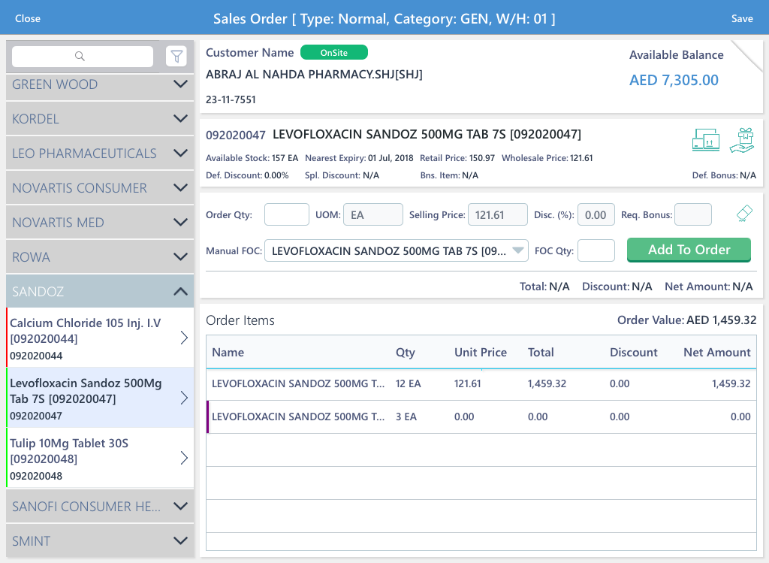
Sales Order screen is where you take orders of the customers. To take orders, tap on Sales Order function button. The Sales Order screen will be shown.
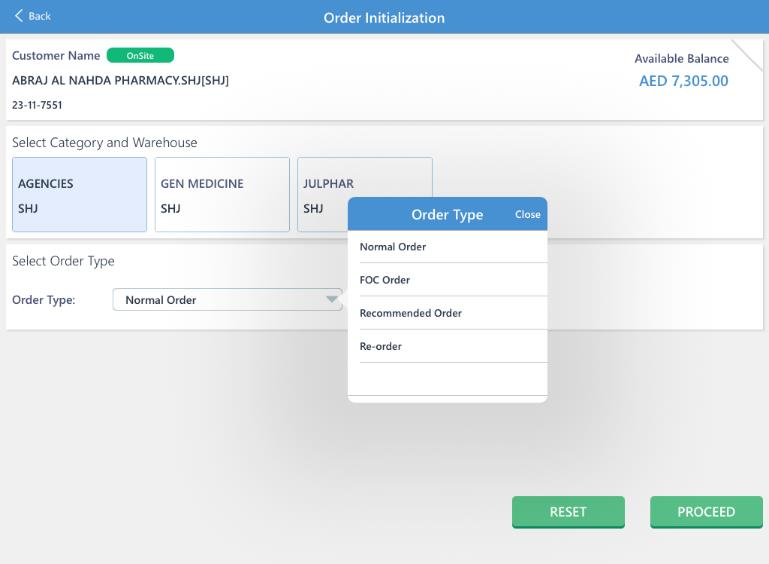
Select category and warehouse from by tapping on the thumbnails.
Select an Order Type from the list.
Order type can be Normal Order, FOC Order, Recommended Order, or Re-order.
Normal order will give you an empty form, where in you can add new products into it. And the regular price will be added to the order based on the price list assigned to customer.
FOC Order allows you to give products as Free of cost. The total order amount will be zero for FOC orders. Only the products eligible for FOC can be added in here.
Recommended order is a feature available in SalesWorx wherein it stores the order history of past transactions, and it automatically generates an order with products and quantity displayed in that. You can edit the recommended list and confirm order.
Re-order is an option where you can place the same order which you had placed for this customer beforehand.
Tap on PROCEED to start with orders.
The Sales Order screen will be displayed.
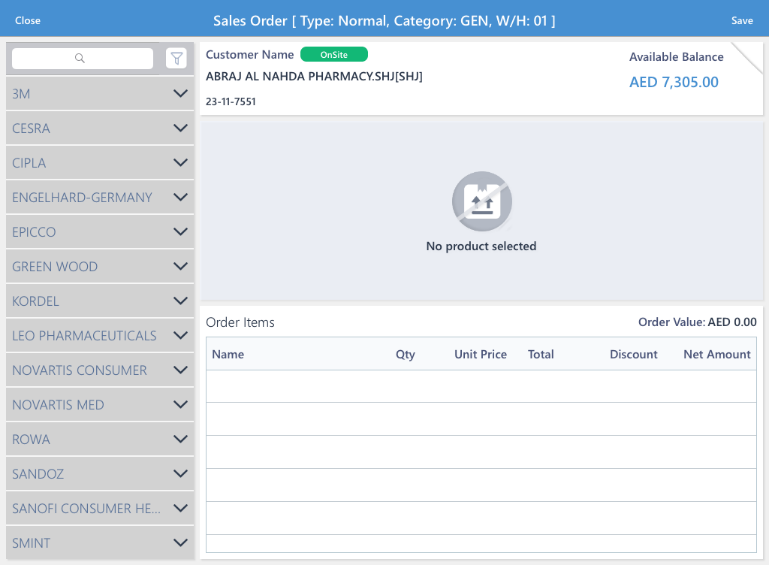
The brands will be listed on the left. It will expand and collapse on tapping.
Tap on a brand to see items listed under the brand.

The items which are in stock will be highlighted using a green indicator to the left. The out of stock items will be indicated using a red colored indicator on the left.
Tapping on an item will display the information related the selected item.

Tap on ![]() icon to view the stock information by Lot numbers.
icon to view the stock information by Lot numbers.
You can see the Lot number, Expiry date of the Lot, Quantity and the Warehouse the item is present in.
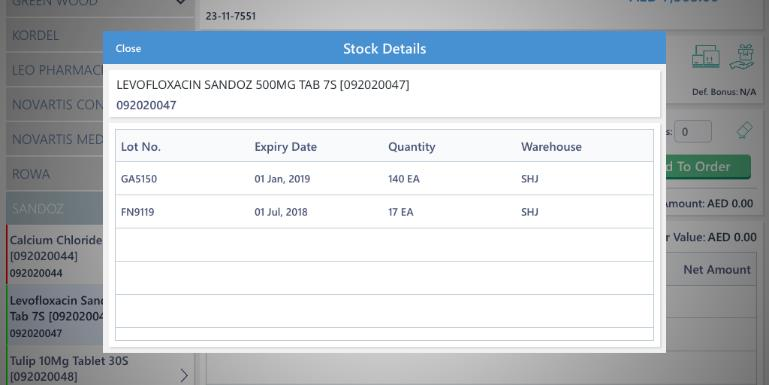
Tap on Close to close the pop up.
Tap on ![]() icon to see the bonus plans defined for the selected item.
icon to see the bonus plans defined for the selected item.
You can see all the bonuses defined, along with the criteria to deliver the bonus item.
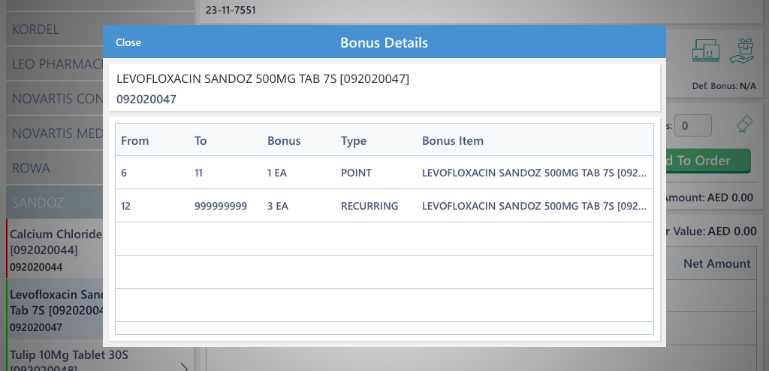
Tap on Close to close the pop up.
Enter the Quantity of the item needed in Order Qty: textbox.
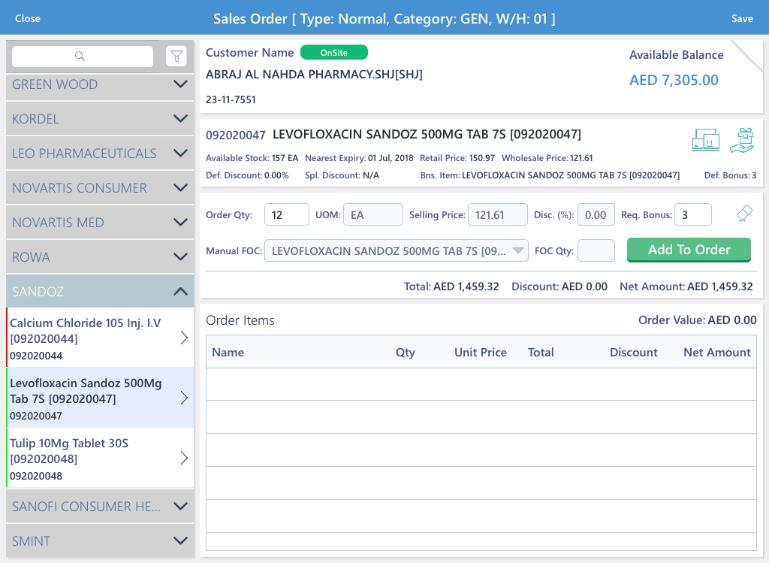
The default UOM of the item is displayed. The Selling Price, Discount percentage, Bonus quantity etc. are displayed.
You can also select a Manual FOC item by tapping on Manual FOC, and then entering the FOC Quantity. Tap on ![]() to clear the entered details.
to clear the entered details.
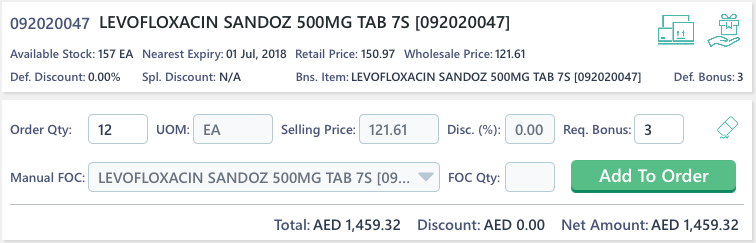
Tap on Add To Order button ( ![]() ) to add item to the ordered items list.
) to add item to the ordered items list.
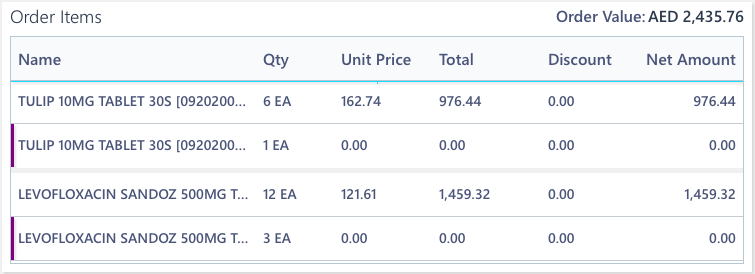
You can observe that the item has been added to ordered items list.
If there is a bonus for the line order item, it will be displayed just below the line order item with Amount as 0.00
Continue the process of adding line order items to order list.
To edit the Quantity of ordered item or bonus item, tap on the line item in ordered list. Edit the quantity in Order Qty/Req. Bonus, then tap on Update.
To remove an item from the ordered items list, swipe left over the line order item.
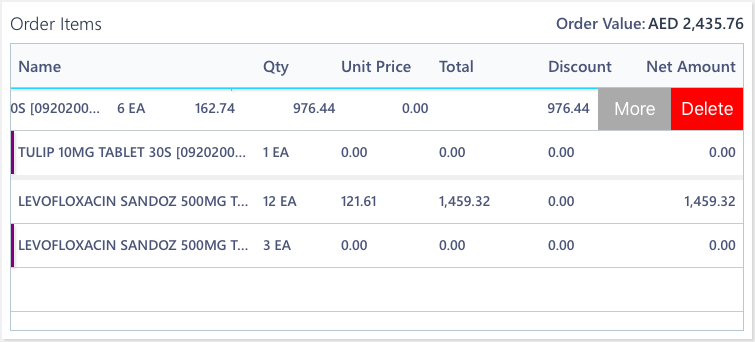
Tap on Delete. The line item will be deleted along with the bonus linked to it.
To select Lot numbers for line items, swipe left, and then tap on More.
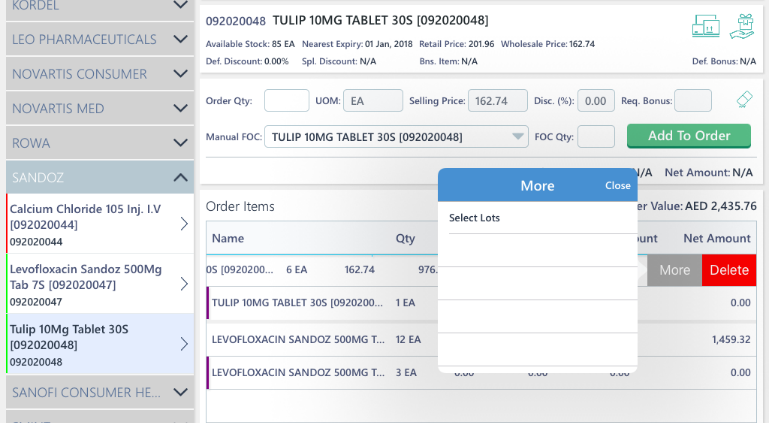
Tap on Select Lots. A pop up will be displayed.
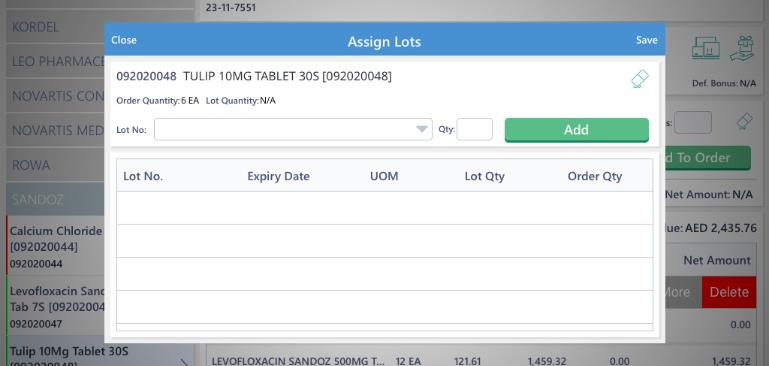
Select the Lot number from the drop down, enter the quantity. Then tap on Add.
The Lot number will be added.
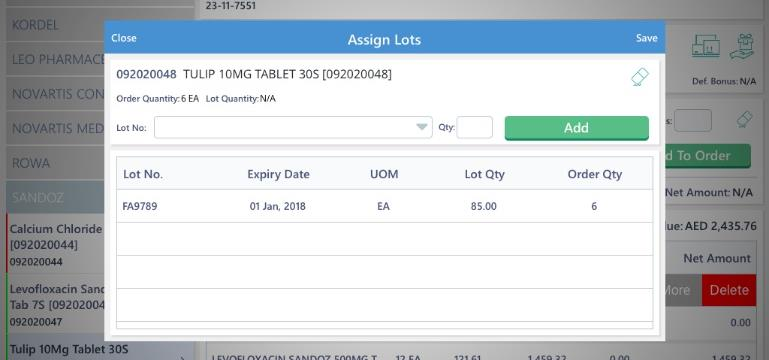
You can also add multiple Lot numbers for an item. For example, if the ordered quantity is 12, you can allocate 6 units from Lot A, 3 units from Lot B and 3 units from Lot C.
Tap on Save to save the lot selection. Tap on Close to close the pop up.
You will be in Sales order screen. Tap on Save button in top right corner to continue.
The Sales Order Confirmation screen will be displayed. You will be capturing additional information related to the order in this screen.
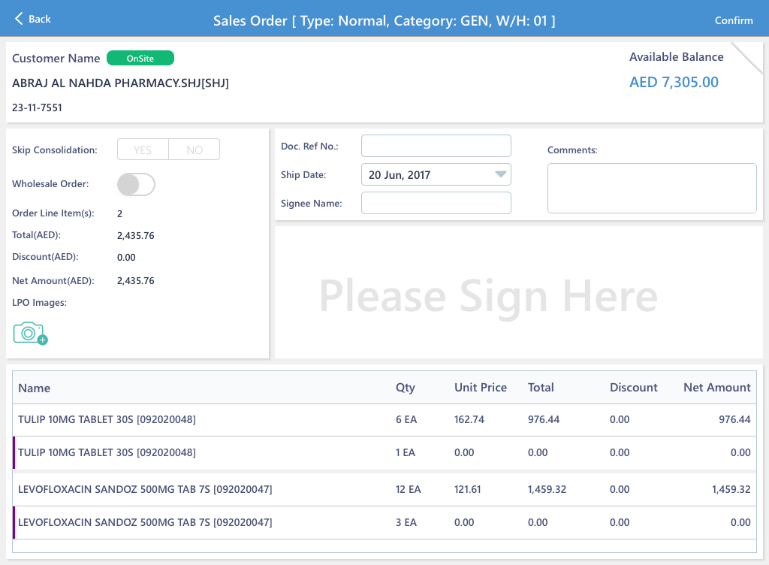
Tap on ![]() button to capture images of LPO.
button to capture images of LPO.
The items in the order list will be displayed in this screen also.
You can enter a Document Reference Number in Doc. Ref. No. field.
Select a preferred shipping date. And enter Comments, if any. Enter name of the Signee and capture his/her signature.
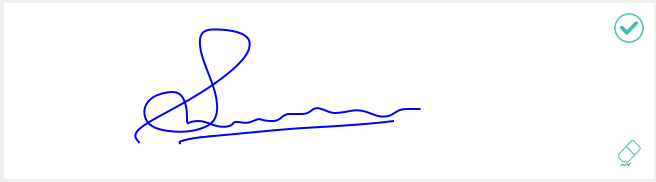
Tap on ![]() to save the signature, or on
to save the signature, or on ![]() to clear the signature field.
to clear the signature field.
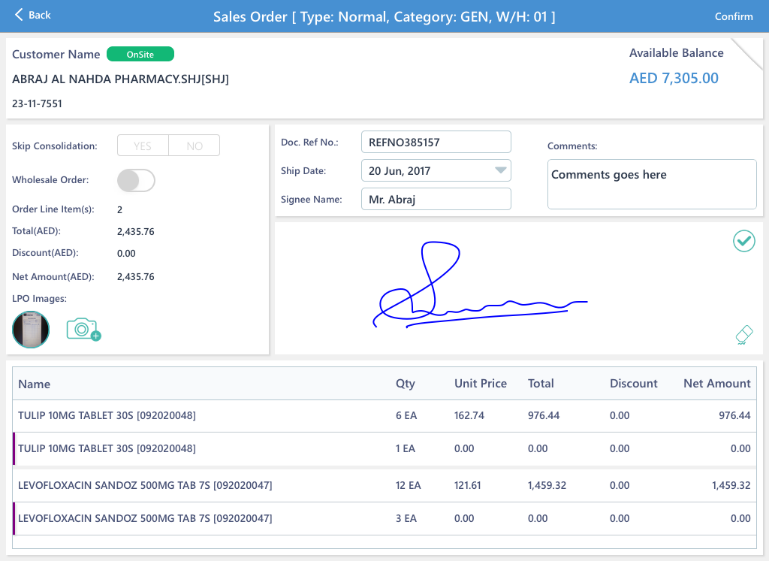
After all the details are entered, tap on Confirm button available in top right corner.
There are two options while confirming. You can either save it as a Proforma order and then confirm it at a later stage, or Confirm it straightaway.
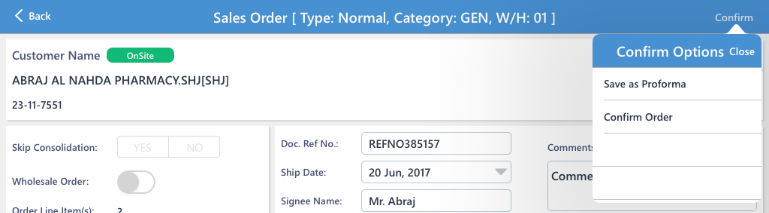
Tap on desired option. You will receive a message “Order Created Successfully” upon confirmation.

Returns
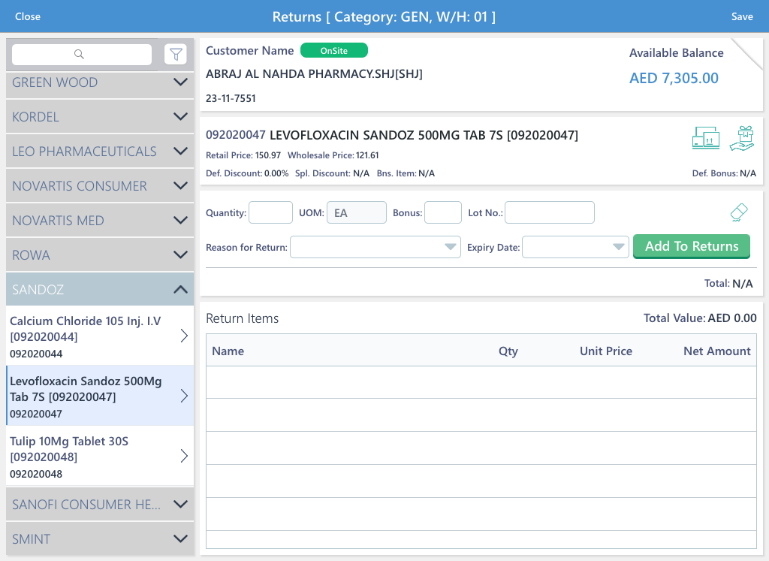
Returns is the module through which you can take returns from customers and issue credit note against it. To take a return, tap on Returns function button in Visit Options screen.
You will see Returns Initialization screen after you tap on Returns.

Select Category and Warehouse by tapping on the appropriate thumbnail.
Tap on Proceed button available in the top right corner of the screen.
You will be presented with Returns screen which is similar to Sales Order screen.
The brands will be listed on the left. It will expand and collapse on tapping.
Tap on a brand to see items listed under that.
Tapping on an item will display the information related the selected item.
Tap on ![]() button to view the stock information by Lot numbers.
button to view the stock information by Lot numbers.
You can see the Lot number, Expiry date of the Lot, Quantity and the Warehouse the item is present in.
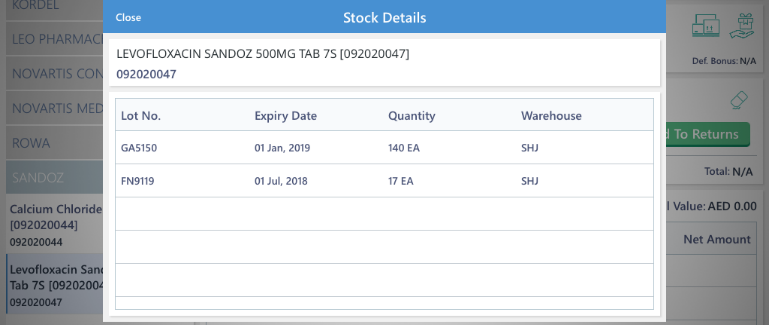
Tap on Close to close the pop up.
Tap on ![]() icon to see the bonus plans defined for the selected item.
icon to see the bonus plans defined for the selected item.
You can see all the bonuses defined, along with the criteria to deliver the bonus item.
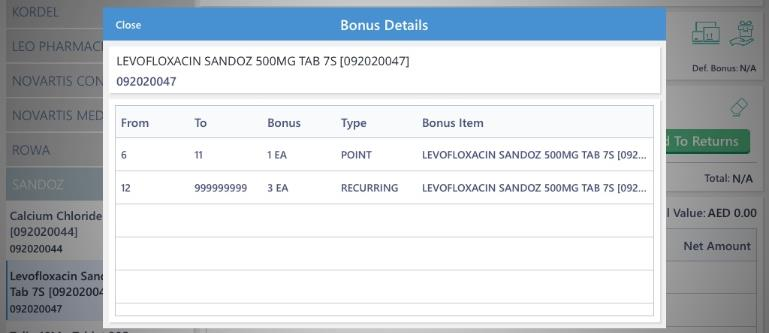
Tap on Close to close the pop up.
Enter the returning Quantity, Number of bonus items, Lot number, Reason for return, and Expiry date.
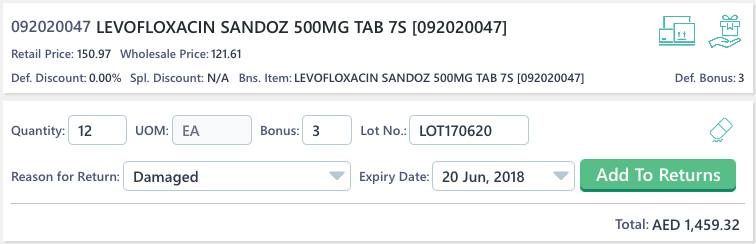
Tap on Add To Returns button.
The item will be added to the returns list.
Continue the process to add more items to returns list.
To update quantity of a return item, tap on the line item and edit. Then tap on Update button.
To delete an item from the returns list, swipe left on a line item.
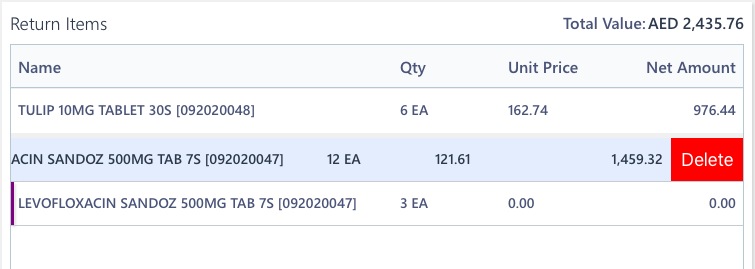
Then tap on Delete. The line item will be deleted along with the bonus item linked to it.
After all the items are added to the returns list, tap on Save button.
You will be presented with Returns Confirmation screen.
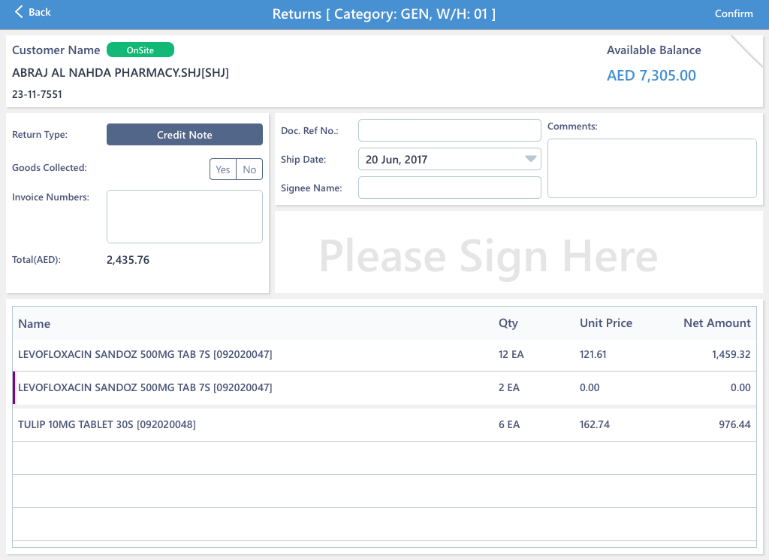
You can add more information to the returns document in this screen.
Select Return Type. It can be either Credit note or Replacement.
Mark whether the goods have been collected or not.
Enter the invoice number against which the returns are being made.
Enter Document reference number, Shipping date if return type is replacement, Name of the Signee and Comments, if any.
Capture the customer signature in the signature area.
Tap on ![]() to save the signature, or on
to save the signature, or on ![]() to clear the signature field.
to clear the signature field.
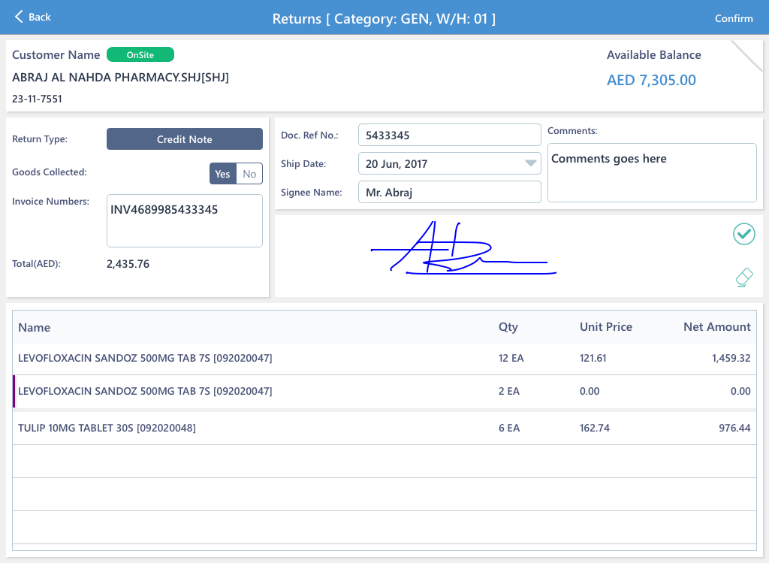
Tap on Confirm button available in the top right corner to confirm the returns.
You will receive a message saying “RMA Document created Successfully”.

Tap on OK to close.
Collection
You can accept payments against invoices in Collection screen. To open Collection screen, tap on Collection function button available in Visit Options screen.
Payment Collection screen will be displayed.
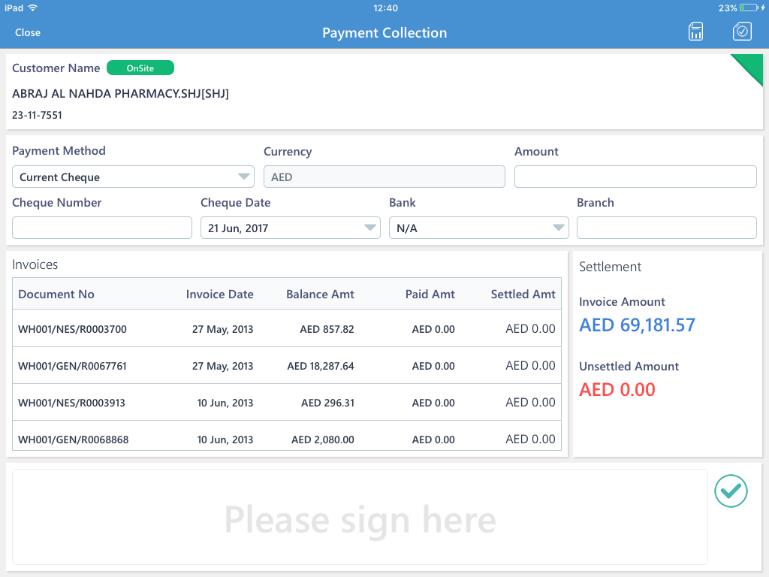
All the pending invoices will be displayed in Invoices section.
You can also view a detailed report on pending amount by tapping on ![]() button.
button.
There are two tabs in the Pop up; Statement and Ageing Report.
In Statement tab, Document number, Invoice date, Amount pending for a document, and Amount paid against a document will be displayed.
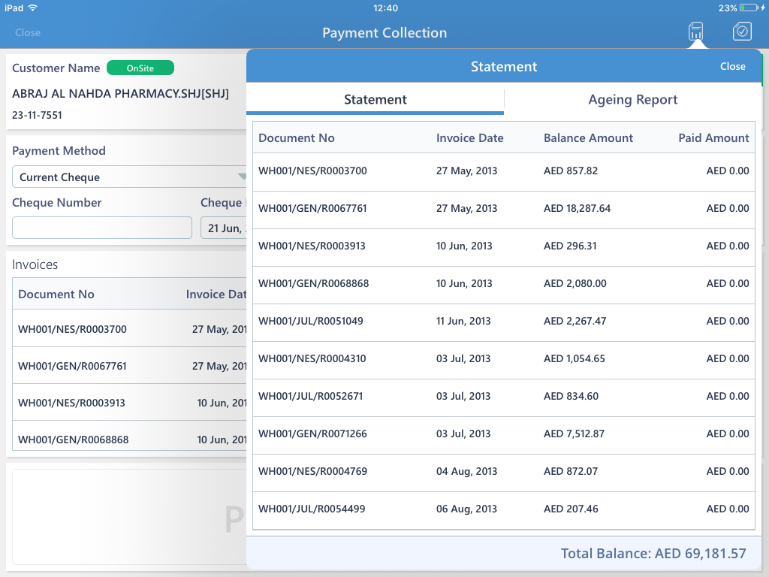
Tap on Close to close the pop up.
In Ageing Report tab, you can see the outstanding amount segregated by number of days.
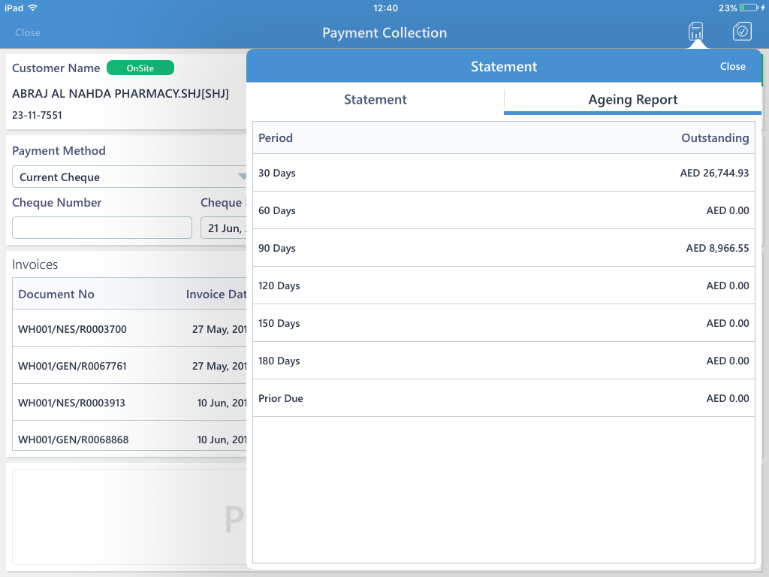
Tap on Close to close the pop up.
To start with collecting payment against invoices, select Payment Method from dropdown. Payment method can be Current cheque, Cash, or PDC.
Type in the Amount you are collecting.
If the selected payment method is either Current cheque or PDC, you will have to enter Cheque Number, Cheque Date, Bank, and Branch.
Tap on the invoices against which the amount is being collected.
The Settled amount field will be automatically filled if the collected amount is greater or equal to balance amount. Otherwise settled amount field will display the unsettled collection amount.
You can edit the Settled amount value if you wish to.
Continue the process until the Unsettled Amount display 0.00
Capture the customer signature in the signature field.
Tap on ![]() to save the signature. Tap
to save the signature. Tap ![]() to clear the captured signature.
to clear the captured signature.
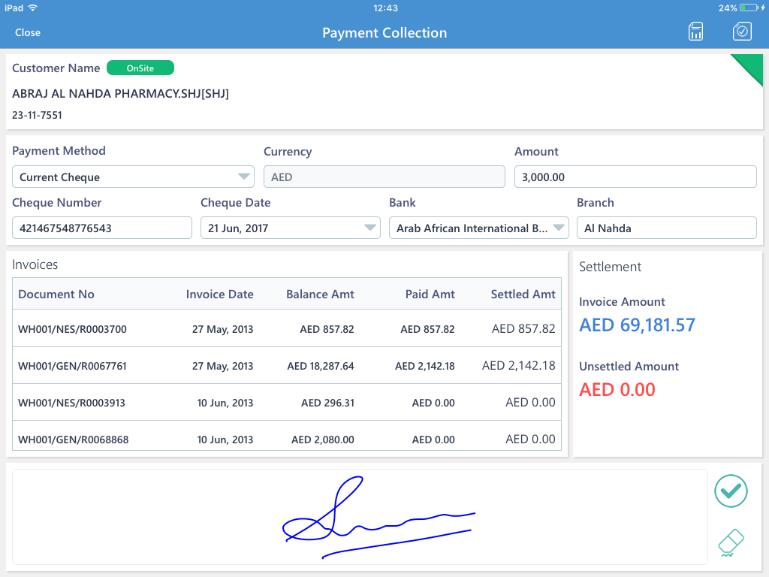
After all the details are entered, tap on ![]() button available in top right corner.
button available in top right corner.
You will receive a success message saying “Data saved successfully”.

Survey
You can conduct surveys during customer visits using the Survey module. To open, tap on Survey function button in Visit Options screen.
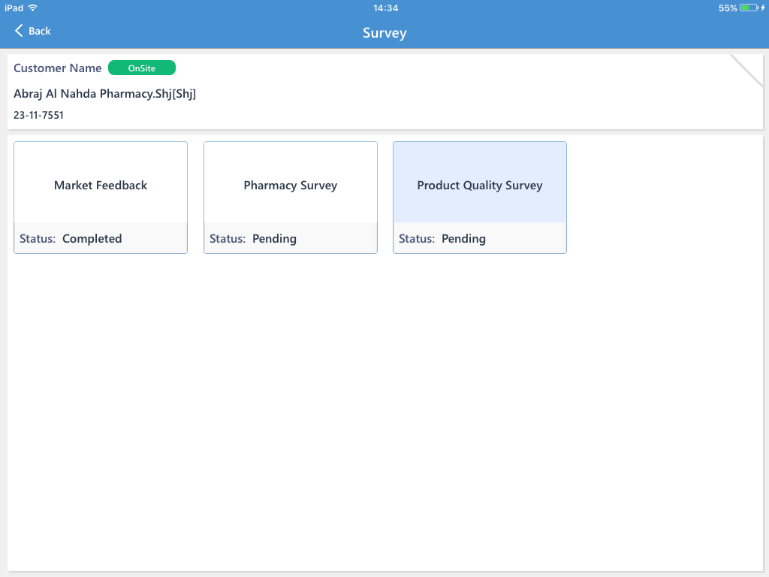
You will be able to see all the surveys assigned to you. None of the surveys will be displayed if they are not created or assigned to you.
The status of the survey will display whether it is pending or completed.
Tapping on a survey thumbnail will open the selected survey. You will be able to see the survey questions and note the responses against it.
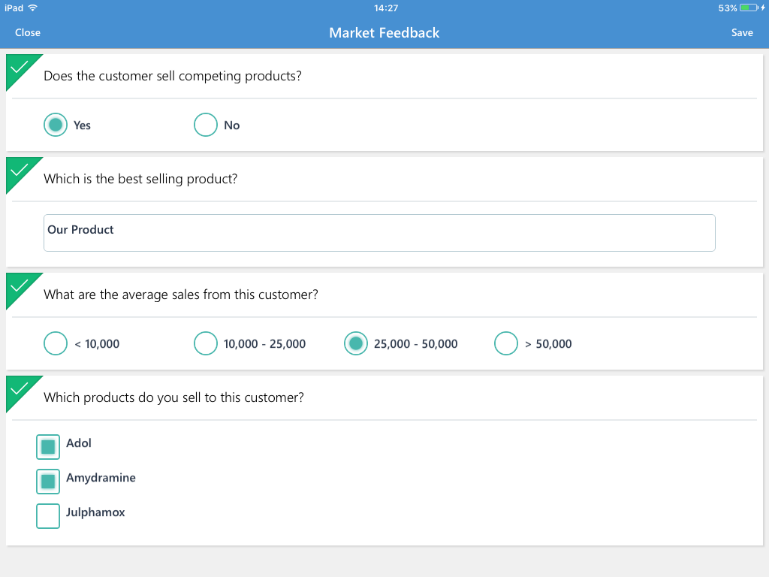
After all the responses are noted, tap on Save. The survey will be saved.
You will receive a confirmation upon successful completion of a survey.

Continue the process to complete other surveys, if available.
Manage Orders
In Manage orders section, you can see all the orders you have created. It includes both confirmed and unconfirmed orders (Proforma orders).
To open Manage orders screen, tap on Manage Orders function button in Visit Options screen.

All your orders will be displayed under Order History Information.
You can see the Reference number, total Amount of the order, the Status of that order (whether the order is confirmed or unconfirmed), and last modified Date of that order.
Tap on an order to view the order.
The order will be opened in Sales order screen.
You will not be able to make any changes if it is a confirmed order. You can only view the details. Tap on Close to go back to Manage orders screen.
If it is an unconfirmed order, you will be able to add new items, edit existing items, and remove items from sales order; just like Sales order.
You can then Save and Confirm the order, or Save as proforma order.
Order History
Order history screen displays all the confirmed orders, their details, and the invoiced items’ details linked to that order.
To open Order history screen, tap on Order History function button in Visit Options screen.
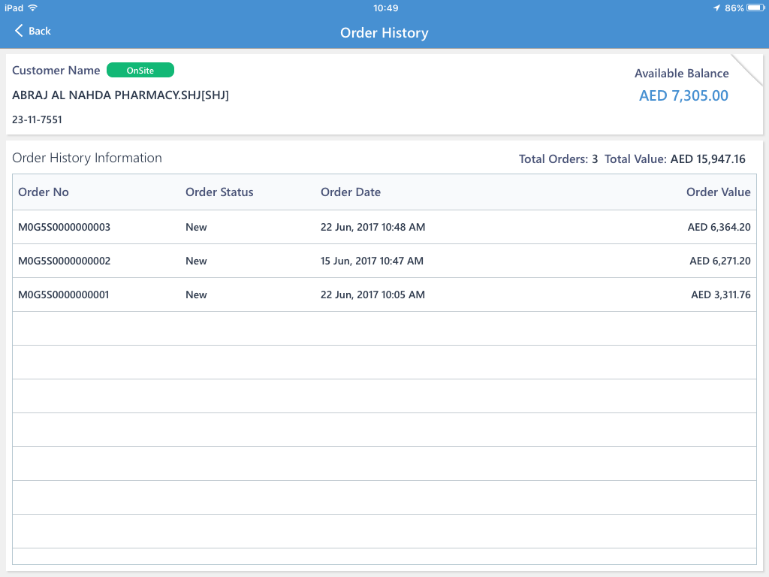
You can see all the confirmed orders along with the Order number, Status of the order, Date ordered, and Value of order.
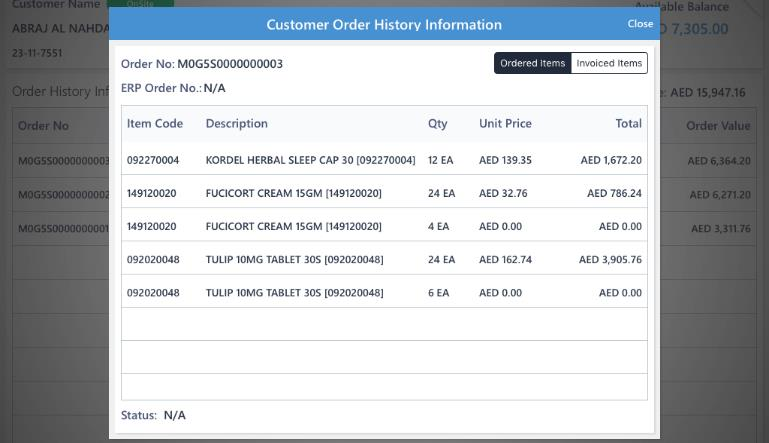
Tap on an order to see more details on that order.
A pop up window will be displayed. It has two tabs; Ordered Items and Invoiced Items.
The first tab displays the details of ordered items.
The second tab displays the details of the invoiced items. This information need to come from ERP.
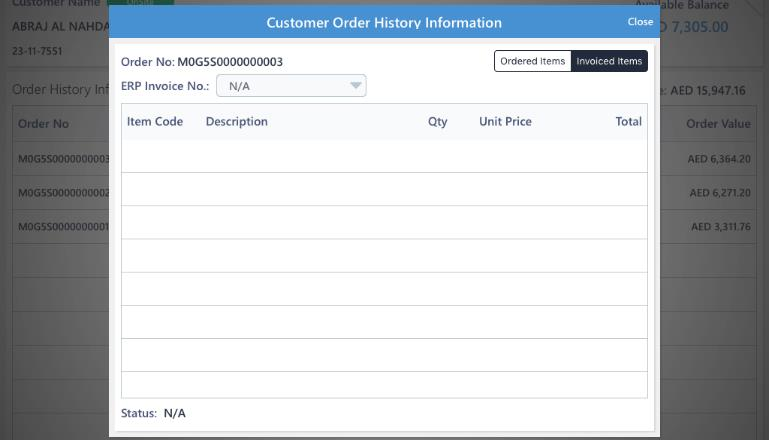
Tap on Close to close the pop up.
To-Do
To-Do tasks can be created, and managed using this module. To open To-Do tasks manager, tap on To-Do function button in Visit Options screen.
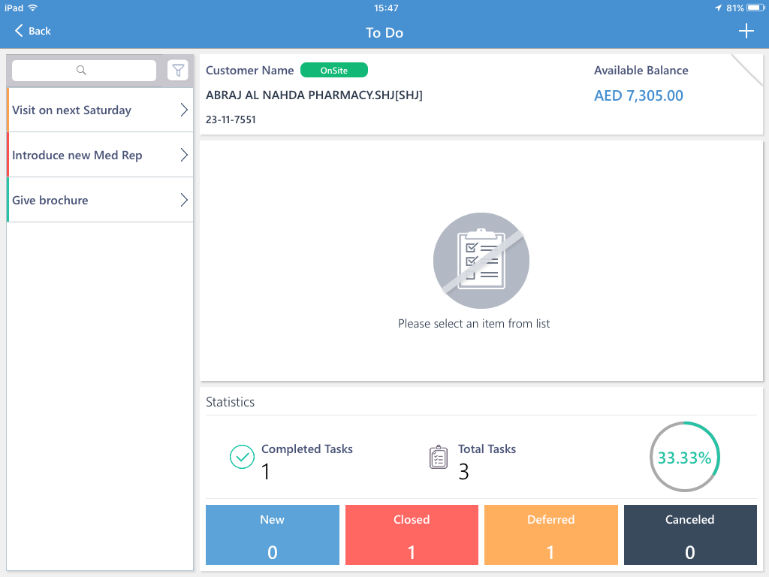
To-Do is a simple module where in you can add new tasks, update the status, reschedule the task etc. for better management of your daily activities.
In the Statistics section, you can see an overview of your tasks created at this location.
You can see the total number of tasks created, the number of tasks completed and the percentage of completion of tasks.
You can also see how many tasks are there in status New, Closed, Deferred, and Canceled.
All the tasks are displayed in the left pane. Color indicators are used to indicate the status of those tasks.
Tap on ![]() to create a new task.
to create a new task.
Enter a Title for the task.
Give a brief Description of the task.
Provide a Date for the task.
Since it is a new task, the status will be set as New and it is locked.
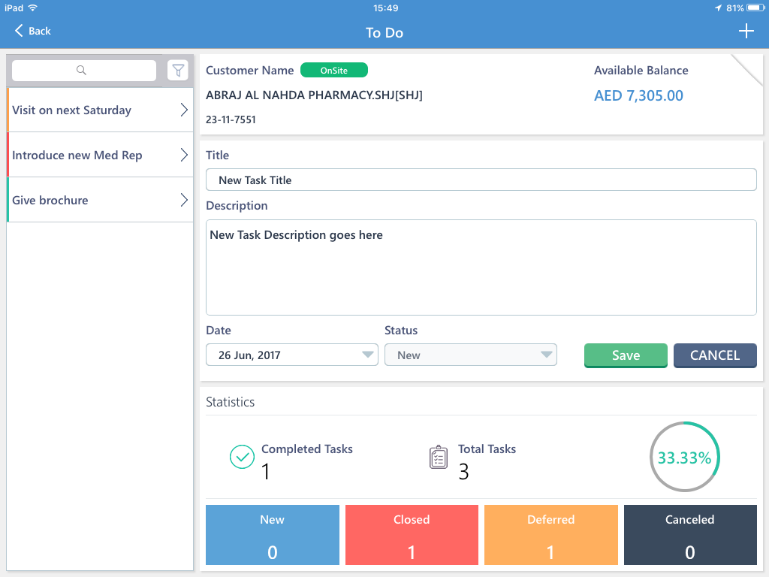
Tap on Save to save the task, or tap Cancel to discard.
To view or update a task, tap on a task among the list in left pane.
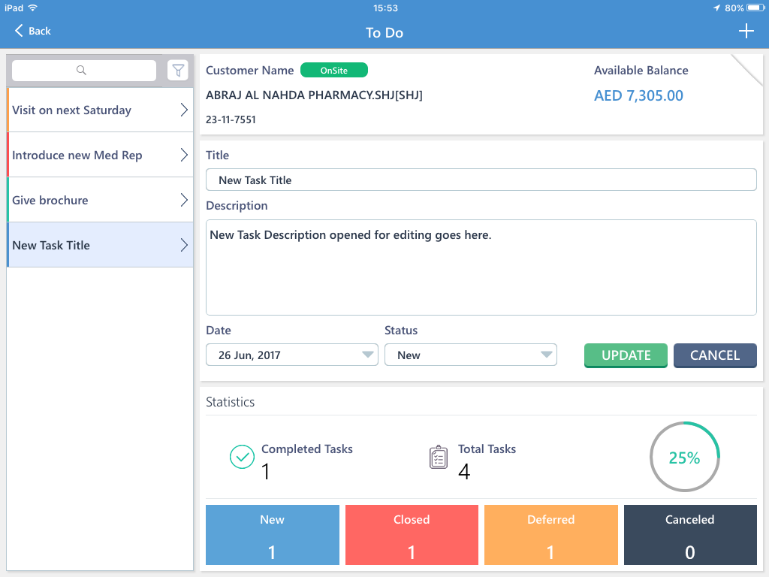
You can edit the Title, Description, Date, or Status of the task.
To save the changes, tap on Update. Tapping on Cancel will discard the changes.
Tap < Back to go back to Visit Options Screen.
After all the visit activities are done, tap on Close Visit button available in top left corner.

A confirmation will be asked, tap on Yes to close current visit and go back to Route or Customers screen.